

AWS provides two cloud-computing CD services that can help ease your path toward the goal of CD automation: AWS CodePipeline, a continuous integration and CI and CD service, and AWS CodeDeploy, an automated application deployment service.
In this article, we provide an overview of how to integrate, configure, and use AWS CodePipeline in your development workflow. We also provide links to various resources that offer much more detail and avenues for exploration.
Why Use AWS CodePipeline?
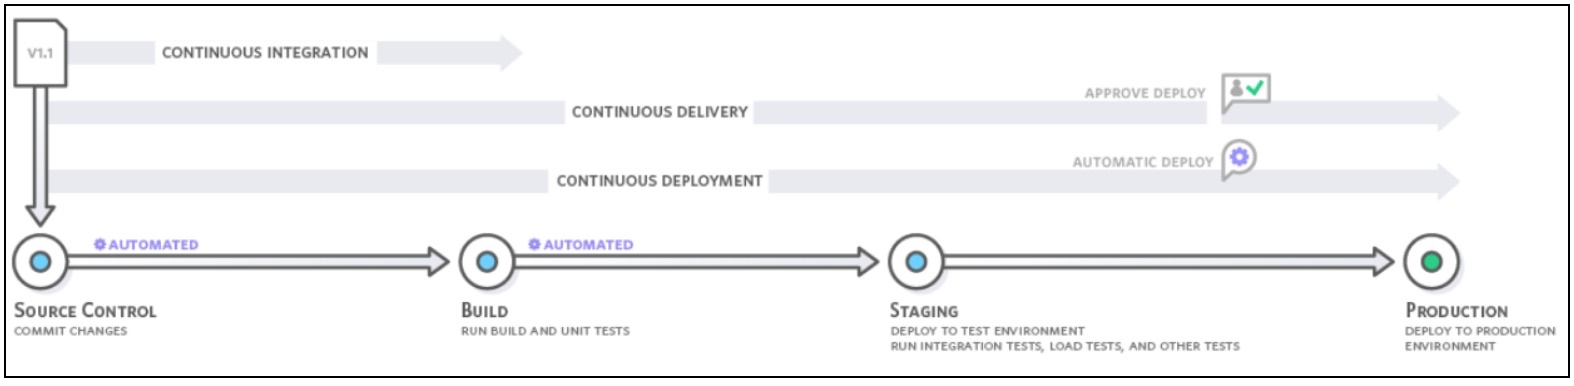
AWS CodePipeline makes it much easier than other CI/CD tools to model, visualize, configure, and automate each of the steps of the process for building and releasing your software products. You can configure the pipeline with a graphical or command-line interface.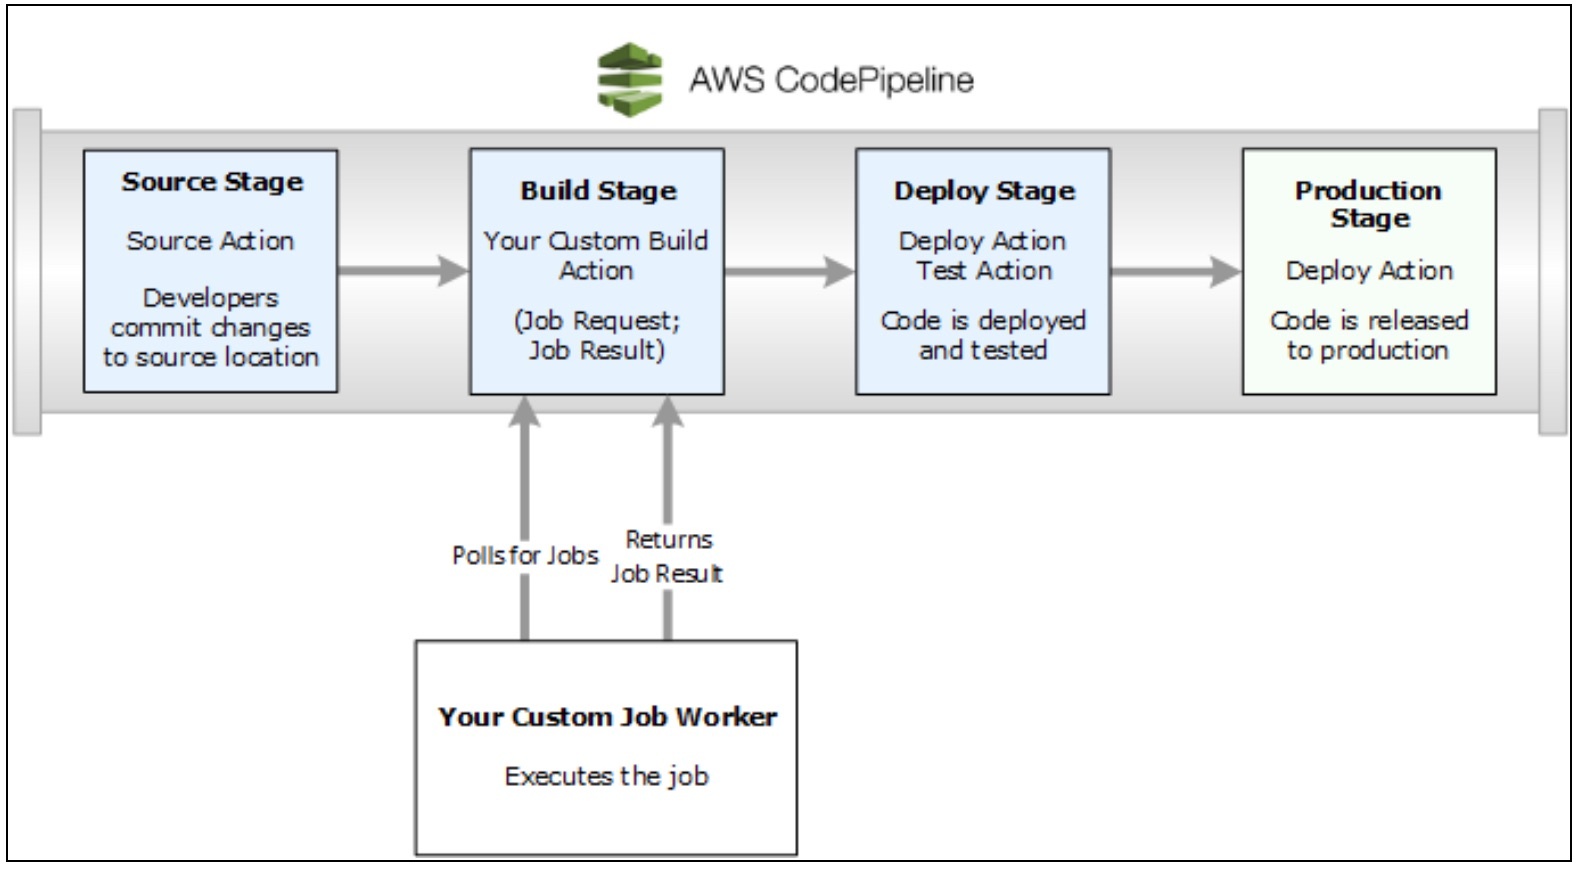
As you configure each stage, you specify which actions are performed on the code as it moves through CodePipeline.
The pipeline builds, tests, and deploys your code according to a release process model that you define. After activating your pipeline, CodePipeline automatically pushes any change to your code repository through the sets of actions that you’ve configured in each stage. Code changes are consistently and reliably run through a standardized process following each commit.
Optionally, you can set manual-approval checkpoints at the end of a stage to ensure that new changes don’t proceed further into the pipeline without authorization. Approvers can review and reject any defective updates and prevent any further progression down the pipeline. CodePipeline also stops your pipeline whenever an action fails, such as a unit test failure. Such automation gives you the ability to test more frequently, and catch bugs when they are small and easier to fix vs. downstream.
AWS provides a comprehensive pipeline toolset so that you can entirely automate your CodePipeline. For a full list of AWS services and third-party tools currently supported by AWS CodePipeline, see Product and Service Integrations with AWS CodePipeline.
With tighter cohesion and easier setup, you can soon get to the point at which your team improves the frequency, speed, and reliability of new feature delivery. You can build out an end-to-end solution with a variety of pre-built plugins for 3rd-party services such as GitHub, Jenkins, and BlazeMeter. In addition, you can integrate your own custom plugins into any CodePipeline stage.
Prerequisites for a CodePipeline
You’ll need to complete these steps before you can configure a pipeline in AWS:
- Create an AWS Account
- Create or use an IAM User
- Use an IAM Managed Policy to Assign AWS CodePipeline permissions to the IAM User
- Install the AWS CLI (command-line interface)
- Open the AWS CodePipeline console
A Simple Pipeline with the AWS CodeCommit Repository
The easiest way to explore AWS CodePipeline and determine its suitability for your development team is to configure a simple pipeline using the Create Pipeline wizard in the CodePipeline console. AWS provides a tutorial that guides you through a simple implementation of CodePipeline, in which you’ll deploy code held in an AWS CodeCommit repository into a single Amazon EC2 instance, using AWS CodeDeploy as the deployment service. You can opt for a versioned S3 bucket for the repository by following the guidance given in Create a Simple Pipeline (Amazon S3 Bucket).
Learn How to Create a Four-Stage Pipeline with a GitHub Repository and Jenkins server
Larger or more mature development teams may want to build and configure elaborate pipelines. Let’s look at configuring a four-stage pipeline that involves a GitHub repository for your source code, a Jenkins server for building the project, and an AWS CodeDeploy application to deploy builds into a staging server.
Before you can create a CodePipeline, you’ve got to configure the resources that will be put to use in the pipeline. If, for example, you want to use a GitHub repository to contain the source code, the repository must be ready prior to adding it to the pipeline. As part of setting up, the CodePipeline tutorial walks you through setting up Jenkins on an Amazon EC2 instance for demonstration purposes.
These are the major steps in creating a 4-stage pipeline with CodePipeline.
- Set up the prerequisites
- Create a Pipeline in AWS CodePipeline
- Add Another Stage to Your Pipeline
- Clean Up Resources
Set up the prerequisites
For Jenkins, CodePipeline requires you to install the plugin for Jenkins on any instance of Jenkins that you’ll be integrating with the pipeline. It’s best practice to configure a dedicated IAM user to provide permission access between your Jenkins project and CodePipeline. Indeed, the easiest way is to install Jenkins on an Amazon EC2 instance that will use an IAM instance role that you create for Jenkins integration—although you can still continue to run Jenkins locally if you prefer.
For Jenkins actions in the pipeline to successfully connect, you’ll need to configure proxy and firewall settings on the server or Amazon EC2 instance that will permit inbound connections to the port in use by your Jenkins project. Also, ensure that you configure Jenkins to authenticate users and enforce access control before you allow connections on those ports. For more information, see Securing Jenkins.
The prerequisite tasks include the following, which are detailed in the CodePipeline docs.
- Copy or clone the sample into a GitHub repository
- Create an IAM Role for the Jenkins integration
- Install and configure Jenkins and the CodePipeline plugin for Jenkins
Create a CodePipeline
With your prerequisites in hand, you’re ready to create the pipeline using the Create Pipeline wizard. An AWS tutorial explains how to integrate a Jenkins instance with a pipeline. That tutorial directs you to download and use a code sample and walks you through a configuration that will convert a code sample from Haml to HTML.
Following successful completion of the wizard, the pipeline will start automatically and push the sample code through the pipeline. You can view progress and success and failure messages as the pipeline builds the Haml sample to HTML and deploys a web page to each of the Amazon EC2 instances in the AWS CodeDeploy deployment.
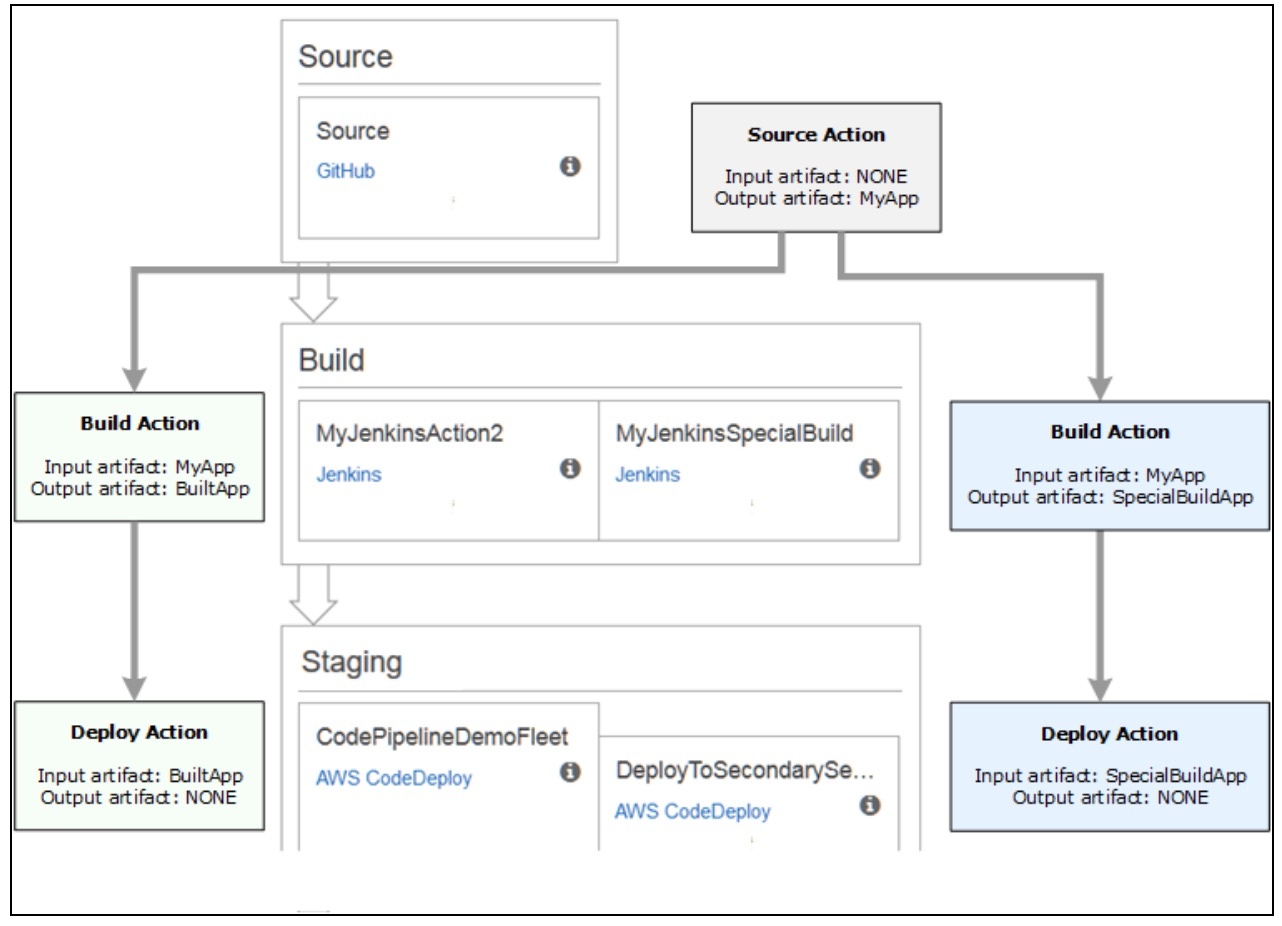
Here’s an example of input and output artifacts of actions in a pipeline:
Add another stage to your pipeline
Next, you can add a test stage and insert a test action into that stage that will use the Jenkins test that is included in the sample. The test will determine if the web page has any content.
The tasks are detailed in the CodePipeline tutorial doc:
- Look up the IP address of the Jenkins instance
- Create a Jenkins project for testing the deployment
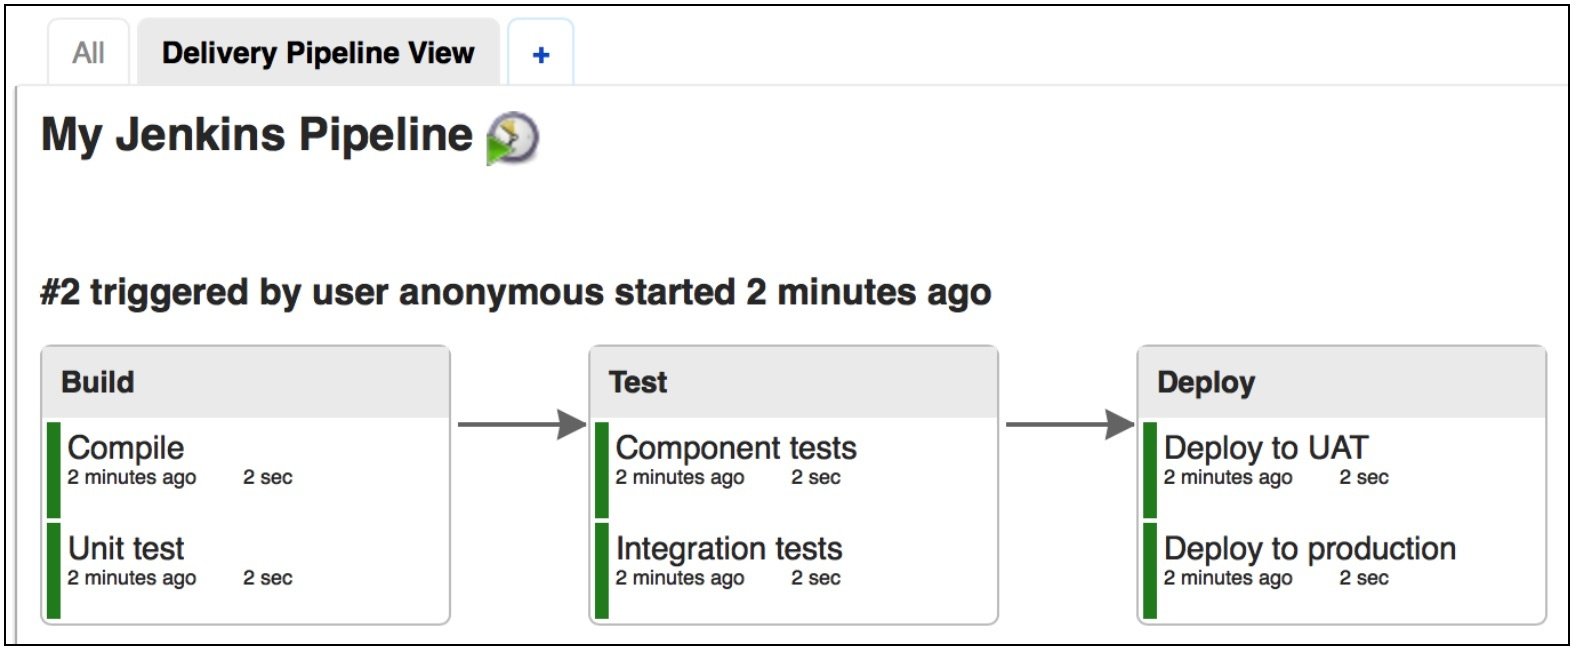
- Create a fourth stage that includes the Jenkins test action
The pipeline view will now display the stages and actions in your pipeline and the state of the revision as it runs through the four stages. The time it takes for the pipeline to traverse all stages will depend primarily on the size of the artifacts, the complexity of your build, and the extent of the test actions.
View Pipeline Details and History in AWS CodePipeline
Use the CodePipeline console or the command-line interface to view details about pipelines on your AWS account. View details for each pipeline, including which actions ran last, the status of a stage transition, failed actions, and other information. You can also view a history page that shows details for all recorded pipeline executions.
Custom pipeline actions
AWS CodePipeline provides many actions that help you configure build, test, and deployment resources for your automated release process. Your release process may include activities not found among the default actions—such as an internally-developed build process or a test suite. Using the AWS command-line interface, you can create a custom action and include it in your pipeline.
Custom actions include:
- A build action that builds or transforms items.
- A deploy action that deploys items to multiple servers, websites, or repositories.
- A test action that configures and runs automated tests.
- An invoke action that executes functions.
Invoke a Lambda Function in an AWS CodePipeline
AWS Lambda is a Amazon computing service by which you can run code without having to provision and manage servers. You can create Lambda functions and then add them as actions in your pipelines. Because Lambda allows you to write functions to perform almost any task, you can customize the way your pipeline works.
These are only a few of the ways in which you can use Lambda functions in a pipeline:
- Deploy changes to your environment by applying an AWS CloudFormation template.
- Using CloudFormation, instantly create resources in one pipeline stage and delete them in another stage.
- Using a Lambda function that swaps CNAME values, deploy application versions with no downtime in AWS Elastic Beanstalk.
- Deploy to Amazon ECS Docker instances.
- Back up resources prior to building or deployment by creating an AMI snapshot.
- Integrate 3rd-party products into your pipeline, such as posting messages to an IRC client. Two specific examples which may be useful would be to send Code Deploy events to testing services like mabl which can show exactly when you deployed code so if any tests fail after the deployment, you can clearly trace them back to the code. Another example would be to send deployment events to a service like AWS CloudTrail which is integrated with production monitoring tools so you can trace production issues back to code deploy events natively within AWS.
Managing Approval Actions
With CodePipeline, you can add an approval action to any stage in a pipeline. You place an approval action at a point where you need the pipeline execution to stop so that someone with sufficient AWS IAM permissions can approve or reject the action. Pipeline execution will resume upon approval. If the reviewer rejects the action—or if there is no decision within seven days—pipeline execution will not continue.
Here are some examples for implementing approval actions:
- A code review or change management review is necessary prior to entry into the next stage.
- Manual quality assurance testing is necessary on the latest version of an application—or you need to ensure the integrity of a particular build artifact— prior to release.
- A review of new or updated text is necessary prior to publishing on a company website.
Resource cleanup after Testing
When you’re done exploring with any of these examples, delete those pipelines and any supporting resources, so that you don’t incur charges for continued use of them. Delete the AWS CodeDeploy application, any corresponding Amazon EC2 instances, and also the Amazon S3 bucket that contains the artifacts. You may also want to delete any GitHub repositories if you won’t be using them.
When choosing the testing service for your CI/CD pipeline, try mabl out for free to see if it fits your needs!


