

As a web developer, let’s say you are already aware of the need to test pretty much anything you build. It's part of your normal process as you build new functionality or content into your sites. You make a change, you check to see whether it works. After you've built your site, you generally give it a once over, to make sure everything is working as you planned.
Everything looks good, so you launch your site. Suddenly, people start complaining that this button or that form doesn't work. You run through a test again, and you start spotting problems, so you fix those.
In an unfortunate testament to how users connect with the sites they use, getting these kinds of messages is actually a lucky break for you. Most of the time, people who find errors don't tell you anything and simply leave your site. Then you have to rely on your test output, where you may be seeing errors appearing in your logs. Or maybe you aren't getting the conversion you think you should.
You need to do this again and again on a regular basis. You find yourself repeating the same tasks endlessly, and testing different parts, with different parameters. You may find yourself writing out a test plan, and then running over each and every piece manually. Next thing you know, you feel like you're spending all of your time testing, a process in which it's easy to make a mistake or leave out an important parameter.
With the shorter release schedules of Agile project management, products are often pushed into production before there is time to run through detailed testing procedures. However, quality is still as important as other project management processes, and you want to put forward the best possible product. This is where testing tools come in.
Many developers in the past have already felt this pain and have created automated systems to improve the QA process by removing some of the rote parts of testing. Some of these solutions come in the form of libraries, others are frameworks with full GUIs to help abstract the coding part of test automation.
There are a lot of tools out there. They can be quite powerful, but a common issue with many is that they often come with a steep learning curve just to get started. For this post, I'm going to take a look at a few GUI-based browser testing tools from the point of view of a beginner to get an idea of what it’s like to learn them, and to compare them against each other.
The Tools
I chose three tools to do a simple test and comparison of. One is a popular open source tool:
-
Selenium IDE – One of the most well-known testing frameworks, Selenium is an open source project that led the way of the Agile approach to QA in web development.
I also compared two closed-source products on the market:
Test Plan
To create a fair comparison, I created a simple set of parameters to use for testing each product.
I approached testing these tools purely from a beginner's perspective and ran through this evaluation with no knowledge at all about testing software. I started with the process of installation, and then identified what documentation existed. I also chose to see how easy it is to use these products right “out of the box” without poring through documentation. If it was deemed necessary, some documentation was examined (briefly).
Each product used the Wall Street Journal website, and ran through the following steps:
-
Click on the “search” box.
-
Type “Apple”.
-
Assert that the live search results below the search field appears.
-
Assert that live results for companies is present.
-
Enter or click Search.
-
Assert that “AAPL” is present in the header.
-
Click first article in list of results.
-
Assert element with className of “wsj-article-header” is present.
Selenium IDE
The first tool I used was one of the most popular: Selenium IDE. As with many open source projects, it was very difficult to find clear, up-to-date documentation. Some stated that Selenium IDE was deprecated; however, with some quick searching, I determined that it is still active and that there is a new version (with fewer features than the original). Unfortunately, many of the online tools gave instructions for the older version, so I decided to see if it was possible to figure out the current version on my own.
Finding and installing the Selenium IDE extension into Firefox and getting started was very straightforward. When starting my first test, I was immediately prompted to enter the URL where the testing will be occurring. Right away, it loaded the site and told me I am recording, which, as a rank beginner to testing tools, immediately confused me. However, I realized that the interface was on a different screen, and at first glance looks like this:
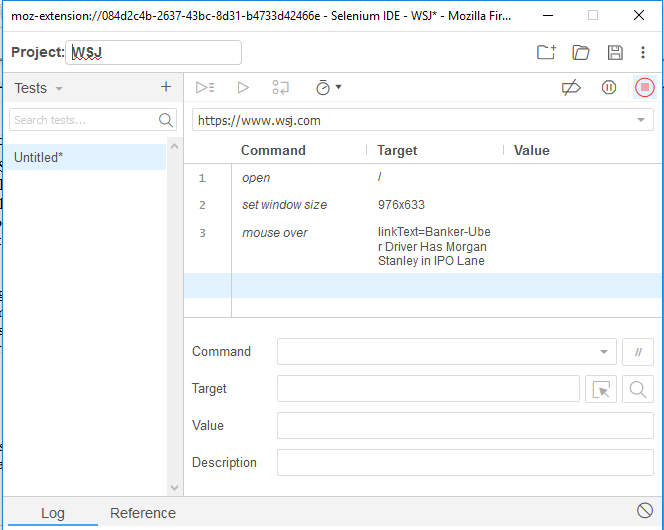
Looking over it, it appeared that there are few buttons, and that the actions are driven by icons on the top bar. The red square seemed to have indicated that I was recording already. So I clicked stop and then started the process over from the beginning, and clicked “record”.
I discovered as I went through the site that it records each action. I did find that the interface was a little confusing and that there's no in-app help. Searching the web only turned up old deprecated tutorials, but I was able to get the basic idea.
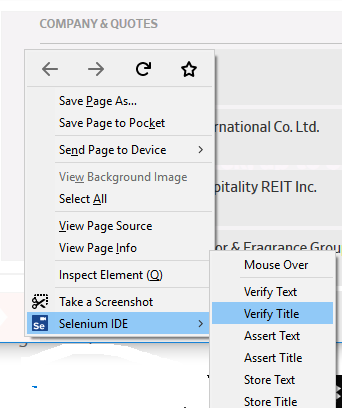
Running through the test and recording the results was fairly straightforward; it picked up my actions and created a row for each one. However, understanding how to assert the existence of an item proved a little difficult. Also, trying to insert new commands was not clear at all. After running through the test, I determined that right-clicking, choosing the Selenium IDE option (as shown below) and selecting “assert text” worked for the most part, and it appeared to automatically identify the class names or other specified CSS entities.
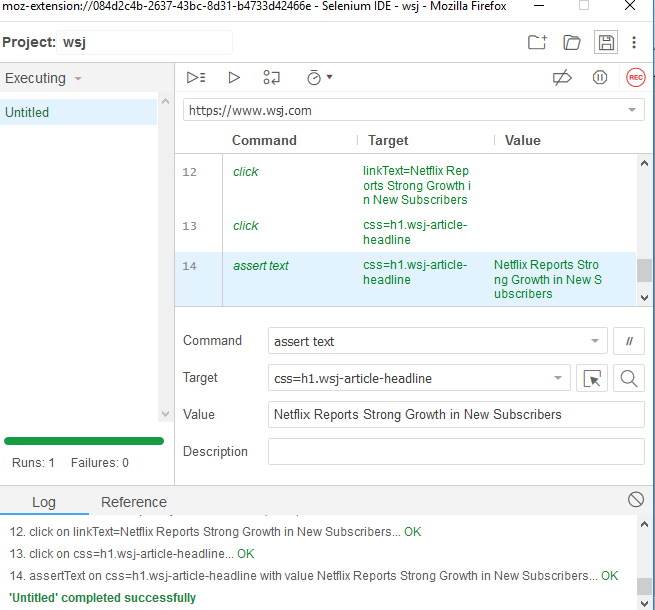
Below is how it was recorded in the application.
One piece that was difficult to determine was how to assert if an element exists at all; it always seemed to require asserting specific text, which could cause some problems for content which changes dynamically.
After completing the test, I played it back, and, for the most part, it seemed to work. However, as expected, the test did seem to break in a few places. Selenium seemed to record every action, including ones I did not wish to record, such as scrolling, or accidental mouse-overs. I tried cleaning up the results; however, this too became difficult. While it was relatively easy to delete certain steps, and to insert manual tests to verify the existence of elements, the test playback often never got to that point, as something would get in the way and cause the entire test to fail and result in errors which seemed unsurpassable. Skipping over a piece of the test did not seem to work, and, even after deleting a step, the playback would stop working.
After fighting through this a few times, I was eventually able to get Selenium to run a successful test. However, this took quite a bit of time to get working, and it did not appear to be easy to perform all of the functions within the test plan.
To be fair, this was my first attempt at working with an integrated testing tool, so it took a little while to figure out exactly how to make it work at all. After a bit of time, Selenium IDE did start to make some sense, but it was quite clunky and, as mentioned before, it had no in-app documentation or help.
While it's clear that there are a lot of features here, the learning curve seemed somewhat steep for a beginner. As for running any tests beyond a simple prototype, this functionality seems to not currently exist in Selenium IDE; all tests appear to need to be run manually. For instance, timing tests to be run periodically does not appear to be an option.
Testim
To get started with Testim, I decided to look at a video on the website to get a feel of how it is supposed to work. Right away, a small issue appeared; the site video claimed that it works on many platforms, so I tried to create an account using Firefox, but immediately discovered it only works on Chrome. While this was a minor irritation, it was not a big deal. On Chrome, I installed the extension, and started it using the installed icon.
Testing was a bit confusing at first, but once I created a project, created a test, and hit the record button, it started to run and record all of my actions. I found it seemed to run a little more smoothly than Selenium.
After running through a test, I was able to see that, on the customized area of the website, there were some pretty interesting and user-friendly features. For each step, screenshots are taken which are viewable later to determine whether it is testing the right thing. As a result, the test results were fairly clear and easy to understand.
However, like Selenium, it seemed unclear on how to assert that an element exists. Inserting a test was possible, and you could add manual validation steps like so:
However, it was not immediately evident on how to create an assert action. Reading the manual suggested that to create assertions requires writing custom JavaScript, which seemed a bit of a steep expectation for a simple task. I explored a little, and discovered that simply clicking or selecting a specific element verifies that it is visible. Unfortunately, it seems there's no way to easily assert that a specific element in the code (such as a class) exists without “teaching” Testim to do so through some JS.
Within Testim, HTML parameters only seem available by clicking on an element. These parameters can be passed to JavaScript, but it appeared difficult to assert that the classname of wsj-article-header was present for the final step.
In many ways, Testim is easier to use than Selenium, and tests run more smoothly. It also offers some functionality to run timed tests and to keep a record of bugs that have been discovered. Unfortunately, as I mentioned, it's difficult to check for specific parameters (how to do so was at least not immediately apparent in the test files), so the full test plan was not able to be executed perfectly.
mabl
mabl's website immediately clarified that it only works in Chrome. The installation process was a little different from the other two: starting required setting up an account on the mabl website.
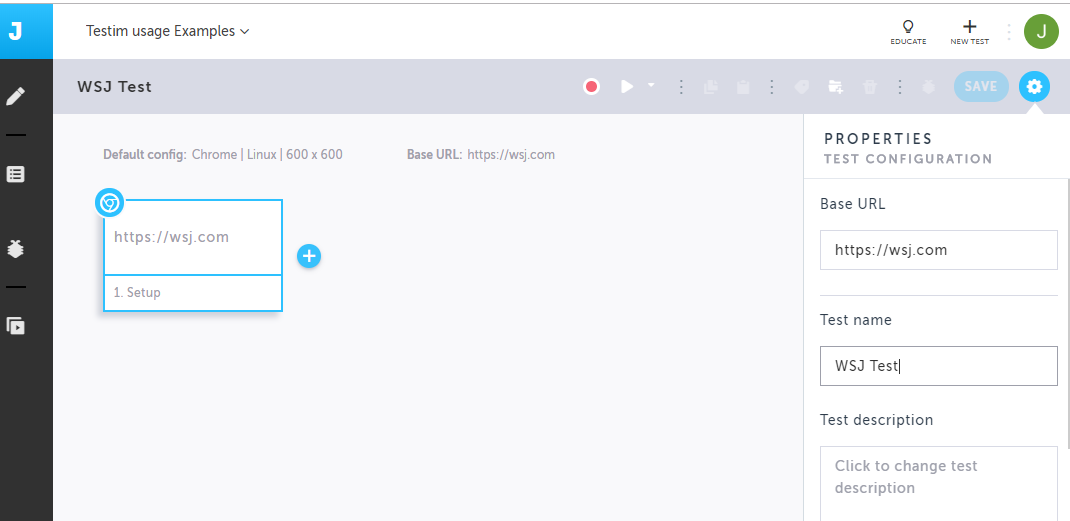
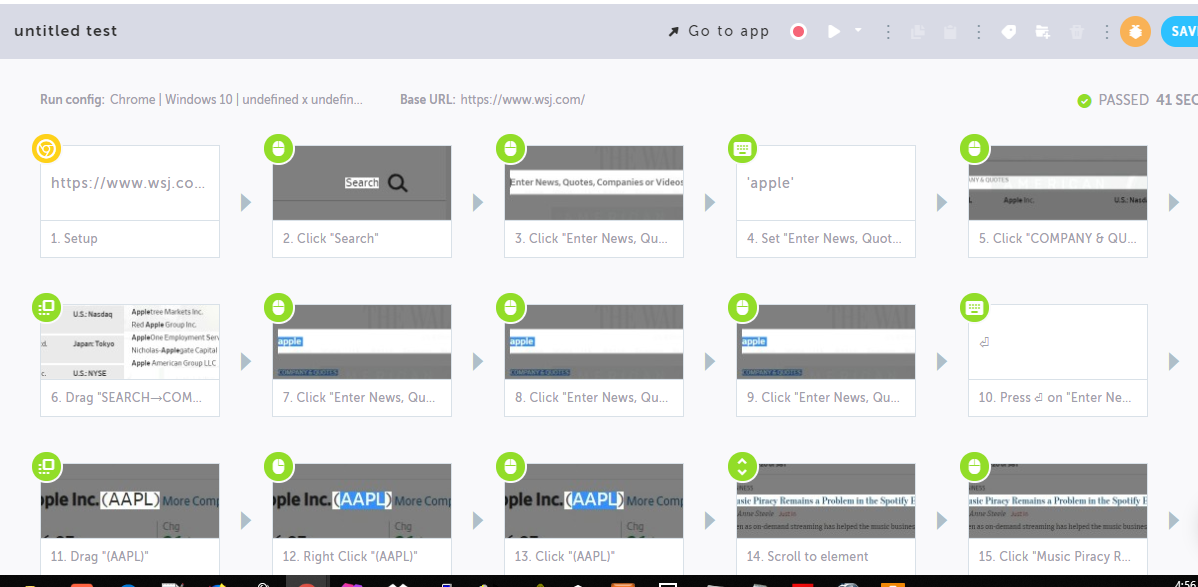
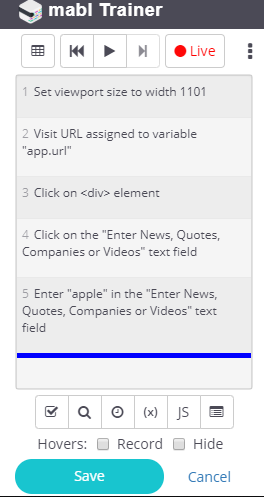
When setting it up, I entered all of the test’s basic information, including the domain of the site to be tested. Only then was I prompted to install the extension called “mabl trainer”. At this point, I was led into the test run. This appeared to work fairly easily, and I was able to run through the entire process with only a few hiccups. The steps were recorded very clearly, and it only recorded what I needed while ignoring any time gaps unless I specified them.
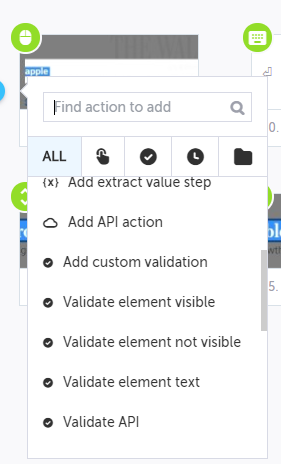
In order to figure out how to add assertions, I needed to try various icons on the interface. Once I found the correct one (indicated by the “checkbox”), it became relatively easy to understand how to assert or validate the existence of an element.
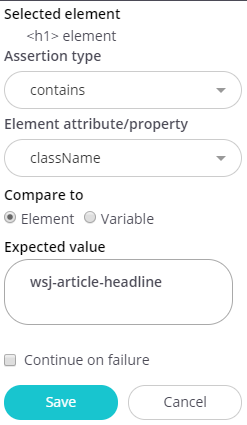
After some examination, the interface turned out to be very clear. By default, it appeared to assert the top level element (e.g. div or p). However, as part of the test plan, I needed to assert the existence of a specific class. At this point, I became a little confused. I looked a little closer and discovered that when choosing a specific assertion command, it provided easy methods for doing almost everything automatically with only some minor adjustments on my part.
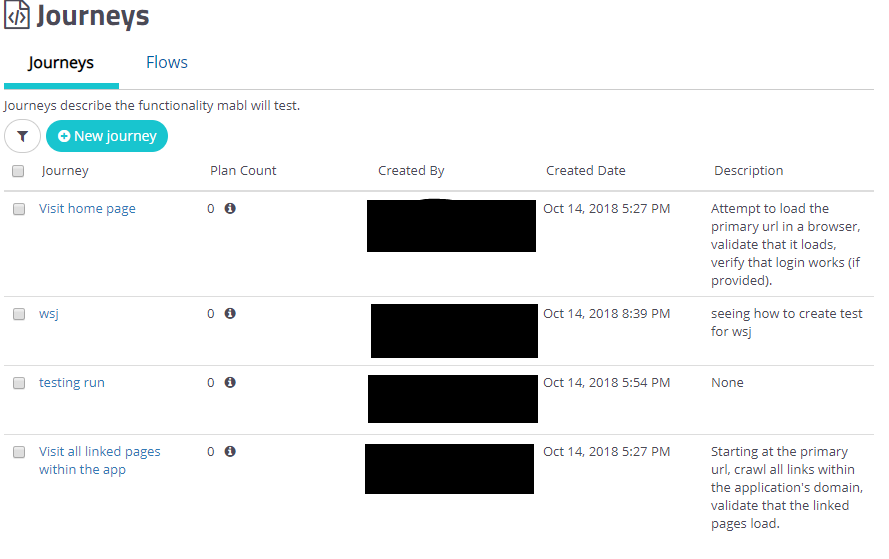
Once I figured this out, I ran through another test run and it worked smoothly. It immediately recorded a copy of the test with all of the specific steps, and allowed setting up a schedule for future runs. To examine a manual run of the test, it simply required setting the scheduled interval as zero and then triggering a run. While I was a little confused at first, after going through the test again, it became far more intuitive.

After saving the file, it was relatively easy to track the “journey,” or test plan that had been created. These can be edited and run at intervals with successes or failures listed clearly. The test outputs have suggestions for resolution.
Conclusion
Overall, each tool had its advantages, but among the three tested, mabl came out on top.
Selenium has the advantage of being free and somewhat flexible and powerful. It does have quite a bit of functionality; however, the ease of use borders on user-hostile. It may do a lot, but you should probably already be well aware of how testing tools work before beginning. Selenium also comes with no scheduling options or clear error reporting. It was also fairly evident that to be able to truly use the features of Selenium, one would need to use their advanced tools, such as Selenium Webdriver, which requires considerably more advanced coding skills.
In terms of initial ease of use, TestIm earns some high marks. It provides a fairly clear graphical web-based interface and it was relatively easy to understand and get going. Where it fails is lack of ease in doing anything remotely more advanced. While it can certainly handle these functions, the learning curve jumps dramatically fairly early on. While it can easily identify your actions, it was far more difficult to get it to identify any underlying elements, such as class names. From a beginner's perspective, it was difficult to see any way to do this without writing custom code.
When compared to the other two testing tools, both from a beginner's perspective and for finding a tool that will actually meet the professional needs for QA testing of a website, the overall winner was mabl. Once working, the ease of use matched TestIm, but also provided quite a few easily understandable advanced features. Without so much as reading a manual, I was able to run through all of the steps in the test plan, including entering custom asserts based on existing code. The features on the dashboard were also very intuitive, and mabl also helped make clear the actual value of using this type of automated testing tool.
While Selenium may be good for those who already know what they are doing, the product is a bit brittle, and needs tweaking to get it working, even with simple tests. TestIm is great for a beginner who just wants to play around and get used to the idea of automated testing. However, overall, mabl appears to succeed both in usability and having enough power to use professionally.
You can get a trial of mabl for free. Just create an account.
Jason Simon
https://jsimonconsulting.com/
@jason_c_simon.

Jason is a professional back-end web developer, database consultant, and systems librarian, with over 20 years of experience helping businesses, non-profit organizations, and educational institutions organize and convert complex data into clear and easy-to-understand information.
All thoughts in this post are his own.


