

How do you define what the most important functions are that you need to test in your application?
Is it the main functionality of your app? What it promises to deliver?
Is it the features your most important customers rely on?
Is it your critical user journeys? Your user stories?
Surely it’s all of the above and probably more, depending on your overall business goals.
But given the release schedule that comes with a CI/CD pipeline, would you say you test these as often as you should? You won’t be alone if you say no. Like most, you have no choice but to triage features for testing, that is, if you get to testing.
With mabl, you don’t have to compromise the quality of your business critical features in the interests of time.
Of course, there's many types of tests you should be running during the development and staging phases of development. But today we’ll show you how mabl covers one of the most basic tests you can run on critical functions of your applications, out of the box: smoke testing.
Just to clarify, mabl covers functional testing, not unit tests.
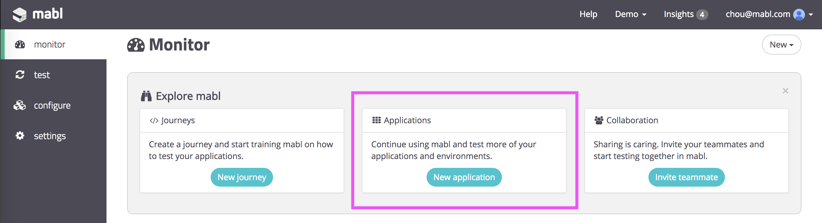
Once we have logged into a mabl, we’ll be taken to the mabl dashboard. In the dashboard, we’re presented with three options to help us get started. We’re going to create a new application.
Next, we’ll need to point mabl to our web app. As long as it can be accessed by the internet, mabl will be able to access it as well.
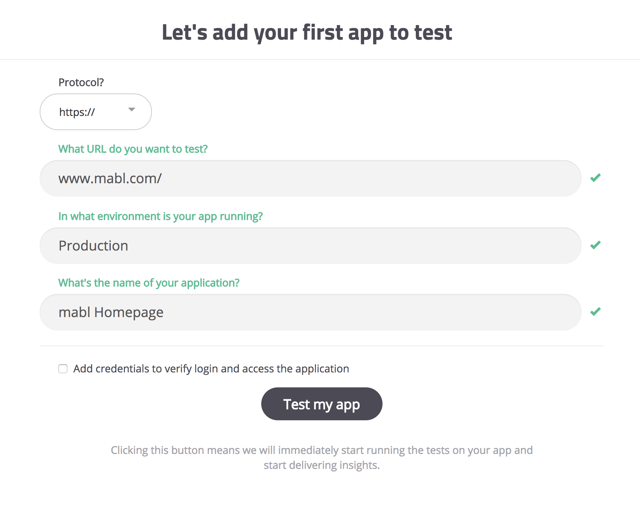
For this example we’ll point mabl at our marketing website in production at https://www.mabl.com. If you have login credentials you can enter them here and mabl will automatically find the login box and test that she can login. We’ll leave this unchecked for our marketing site though.
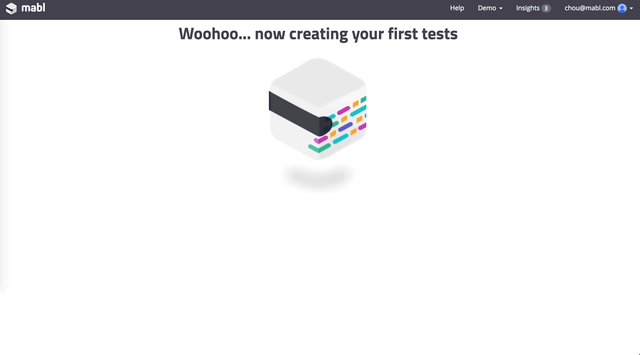
As soon as we click “Test my app”, mabl automatically creates two smoke tests:
- A basic Journey that loads the application with a default Plan.
- A default link crawler that will run daily.
Before we continue, let’s define some jargon:
A Journey describes the functionality that mabl should test.
A Plan specifies how mabl should execute your Journey(s). A Plan would include things like how you want to kick off your journeys (on schedule, on deploy, etc) as well as which Environment (Dev, QA, Staging, Prod) you want to run your Journey against.
So the first thing that mabl does when we point her at our app is create a Journey to check if the mabl homepage loads successfully.
The second thing that mabl does is kick off a link crawler plan. Applying our newly acquired jargon here; the link crawler is simply a Journey which begins at the primary URL and crawls all links within the application's domain, validating that the linked pages load, checking for broken links and JavaScript errors. This second created Journey runs on a Plan that’s set to run daily, or every 24 hours, by default.
Starting to catch onto Journeys and Plans, right? Good.
Now, of course, we want to see the results of those smoke tests, so we’ll click on one of the default Plans, where we’ll find its execution history. Let’s take a look at the link crawl Plan, labeled: “Check all pages for broken links and errors”.
At this point, we’d normally only see one completed execution, but I’ll show you a more “veteran” plan so we can look at more interesting data:
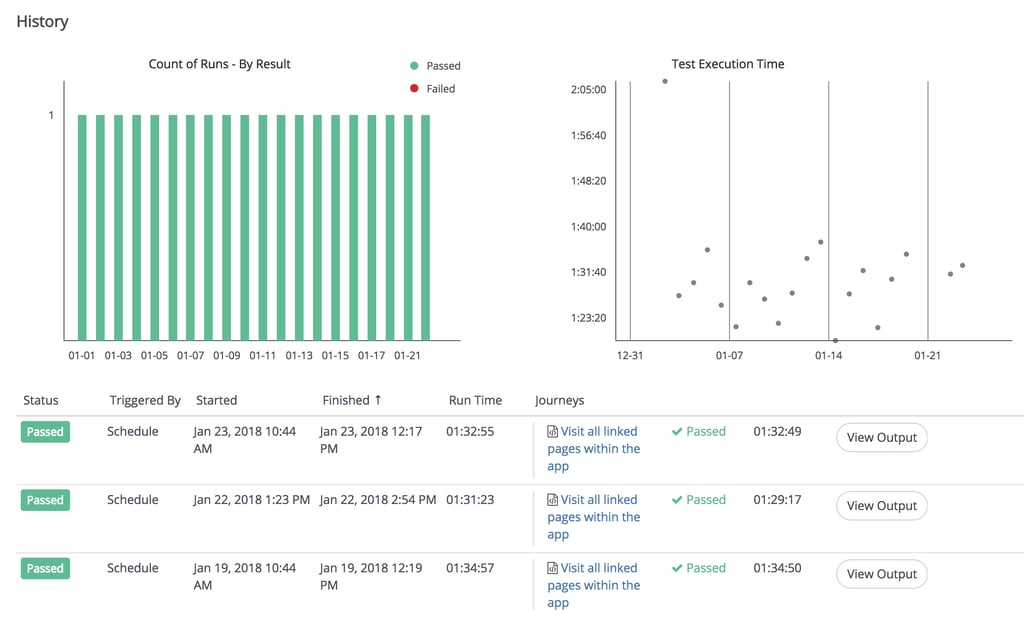
In the top left, we find the count of test runs by date, color coded by how many tests passed vs. failed.
To the right, we find the Test execution time. Performance regressions and anomalies will be easy to spot here.
At the bottom we find each individual Plan and the information we want to know about that Plan - which Journeys it executed, whether or not the test passed, and the output for that execution.
If we click on “View Output”, we see the overall status of our website Journey as of our first test run:
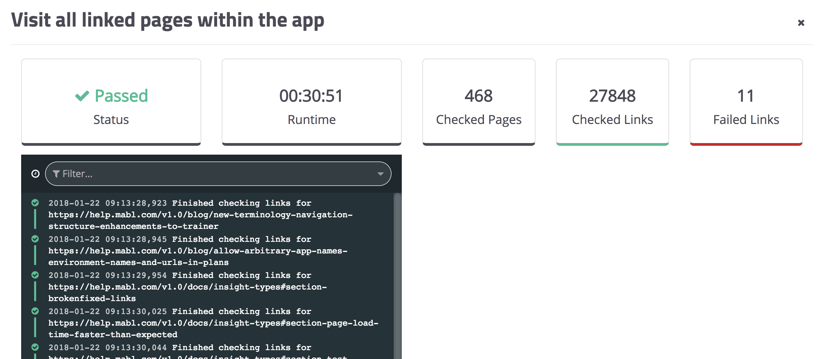
Without a single line of code, mabl ran a smoke test that checked 468 pages, 27,848 links and found 11 failed links in a matter of 30 minutes! On top of that, I can expect mabl to provide me with a health report every day, along with Insights on what’s changed in my app so I can stay on top of any show-stopping issues before our visitors notice them!
Let’s also take a look at our default Journey, the mabl homepage status check. After all, our marketing website is often where people first learn about mabl, so I want to make sure that it’s working well.
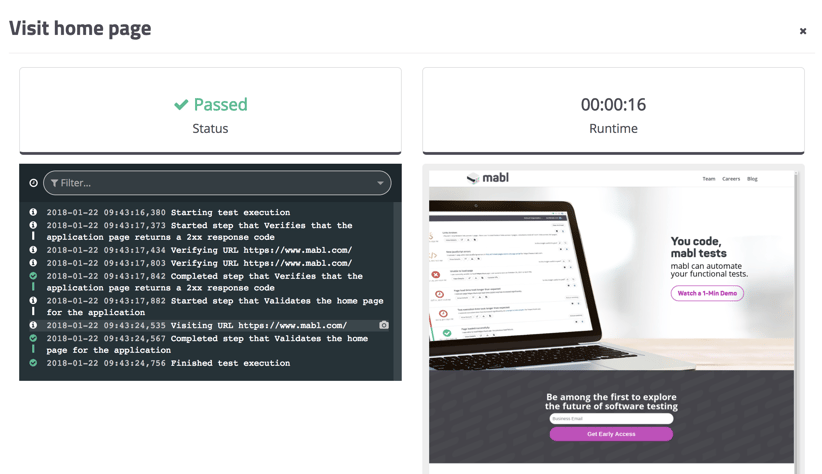
I can see that this smoke test also passed, and to the right, mabl shows the screenshot she captured of the homepage as it appears on the client’s side. In more complex Journeys that span multiple web pages, mabl will capture a screenshot every step of the way so you can easily diagnose broken areas of your application.
This was a very basic demonstration of how you can do smoke testing without spending time managing code or infrastrure. With mabl, you can go on to do more automated testing by creating custom Journeys that follow your application’s critical user journeys, run Plans containing several Journeys, and run multiple Plans simultaneously.
How can you get your hands on this? Just sign up for a free account:
![]()


